How to Measure for Curtains: Width, Length and Panels
Learn how to measure for curtains, calculate panel width and check length for your heading. Includes diagrams, a worked example and a measuring worksheet.

To measure for curtains, start with the rod or track you will actually use. Measure its usable coverage width, work out the panel width using the seller’s fullness instructions, then measure the drop from the correct point for your curtain heading. Window-glass dimensions alone will not give you the right order size.
This guide explains how to measure for curtains with a worked width calculation, a length diagram and a checklist you can copy for every window. Keep measurements in inches for a U.S. order, and confirm the supplier’s definitions before buying.
Before measuring: choose the mount and check obstacles
Use a metal tape measure, pencil and paper. Measure each window separately, even when two windows appear identical. Keep the tape straight and record the reading accurately; round only as the ordering instructions require. Get help for measurements you cannot reach safely.
Decide whether the curtains will hang outside the window opening, on a wall or ceiling rod or track, or inside the recess. Outside mounting lets the fabric extend beyond the trim. An inside-mounted rod or tension rod must fit the opening and its required recess depth. Check handles, trim projections, blinds, shelves and nearby furniture.
🛑 Curtains can catch fire near a heater. Keep fabric outside the clearances in your heater’s own manual, and do not cover it with curtains. If that prevents a floor-length treatment, choose a different arrangement. Cadet’s installation guidance directs owners to the product manual for the applicable safety requirements.
Choose the hardware before taking final measurements. If it is not installed, record the proposed rod position and check the final position after installation. This guide covers measuring, not selecting wall anchors or drilling around concealed wiring.
Step 1: measure the width the curtains must cover
For a straight rod, measure the usable span that the curtains cover, excluding decorative finials. If you are planning a new rod, measure the window including the trim, then add the planned extension on each side.
That extension gives the open curtains somewhere to sit. The gathered fabric is called the stack-back. Thick, lined curtains usually need more room to park than a thin sheer of the same flat width. Check the product and heading rather than assuming one extension fits every window. Limited wall space or a corner may call for a different opening direction.
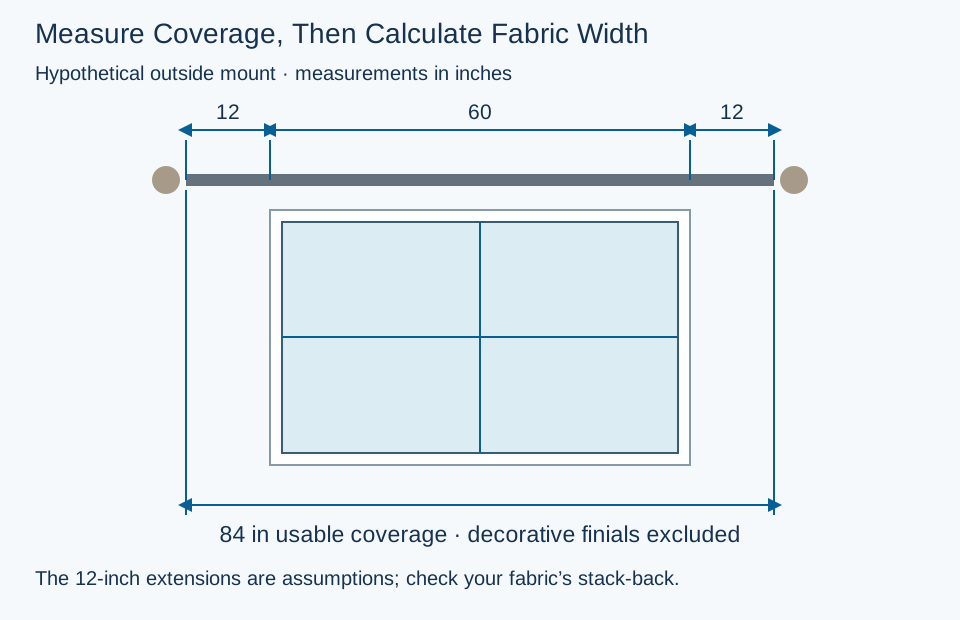
For an inside mount, measure the actual opening at the intended rod position and follow the hardware’s fit allowance. For a track, return rod, bay window or corner system, use the manufacturer’s measurement diagram. A return brings fabric toward the wall; an overlap allows the leading edges to pass each other. Confirm whether the seller already includes these allowances before adding anything.
Step 2: calculate the panel width and quantity
Fullness is the extra fabric that creates folds when the curtains are closed. For panels sold by their flat width, multiply the required coverage by the recommended fullness factor. Then divide by the width of one panel and round up to whole panels. For a balanced center opening, choose a quantity you can divide evenly between the two sides.
| Hypothetical fullness | 84-inch coverage × factor | Total flat fabric width |
|---|---|---|
| 1.5 times | 84 × 1.5 | 126 in |
| 2 times | 84 × 2 | 168 in |
| 2.5 times | 84 × 2.5 | 210 in |
These show the arithmetic, not three interchangeable specifications. Use the factor recommended for your fabric, heading and desired appearance. Too little width can leave curtains looking stretched when closed; extra panels change how much wall space the open stack needs.
Hypothetical Ready-Made Order
4 panels84-inch coverage × 2 = 168 inches of flat width needed. At 50 inches per panel, 168 ÷ 50 = 3.36. Four panels give 200 inches total, or about 2.38 times fullness.
In that example, place two panels on each side for a center opening. If the listing sells a pair of 50-inch-wide panels, order two pairs, not four pairs. Check whether its stated width means each panel or the entire pair. Alternatively, a custom flat-width order could provide two 84-inch panels, if that is how the seller specifies the product.
Do not multiply finished pleated widths again
A made-to-measure pinch-pleat curtain may be sold by its finished coverage width, with extra fabric already built into the pleats. Ripple-fold curtains may depend on a matching track and carrier spacing. Do not use the flat-panel formula for those products unless the maker specifically directs you to.
TWOPAGES’ measuring instructions distinguish finished pleated widths from flat soft-top panels and show how the hardware changes the order. Follow the instructions for your selected product, including returns and overlap.
Step 3: measure the length from the correct starting point
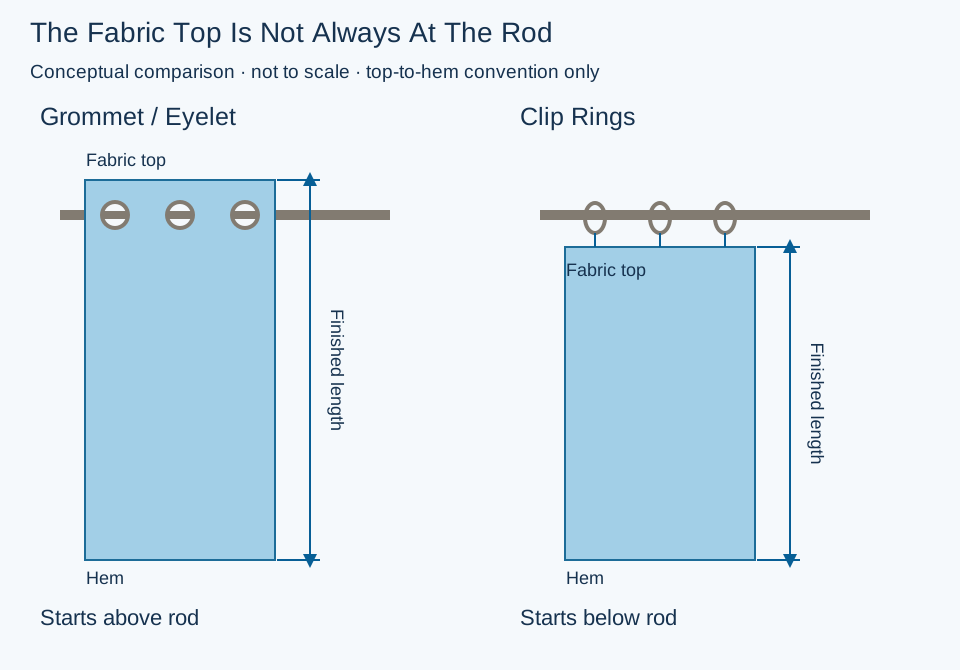
The correct starting point depends on the heading and the supplier’s definition of finished length. Do not automatically measure from the top of the window or even from the top of the rod. The fabric may begin above the rod, below it or beneath a track.
| Heading or hardware | What to confirm before measuring |
|---|---|
| Grommet / eyelet | The fabric usually extends above the opening that sits on the rod. Confirm whether listed length includes that top fabric. |
| Rod pocket or tab top | Check whether the header or tabs are included in the listed length and where the fabric rests on the rod. |
| Clip rings | Clips hang the fabric below the rod. Use the actual fabric-top position for a top-to-hem length specification. |
| Pinch pleat with hooks | Confirm the hook position and whether the order is measured from a hook point or the fabric top. |
| Track / ripple fold | Use the maker’s track or carrier reference point and any specified hardware deduction. |
Measure the drop at the left, center and right of the planned curtain span. Floors and ceilings can be uneven. To keep a level hem off the floor, base the length on the shortest drop to the floor from your chosen level reference, then subtract the intended gap. A gap may be larger elsewhere. If the difference is noticeable, ask a curtain maker about a custom solution before ordering.
Step 4: choose where the hem should finish
| Finish | Where it ends | Practical tradeoff |
|---|---|---|
| Sill | Just above the sill | Useful where long fabric would obstruct furniture; check handles and movement |
| Apron | Below the sill at a chosen point | Mark the exact endpoint; do not rely on the style name to supply a dimension |
| Floating | A small chosen gap above the floor | Easier to move and clean beneath; check the gap across the full span |
| Touching | At the floor with little or no excess | Needs careful measurement on an uneven floor |
| Puddled | Extra fabric rests on the floor | More fabric to clean and move; unsuitable where it creates an obstruction |
A floor finish is a design choice, not a reason to ignore a heater, vent or doorway. Choose the practical endpoint first. Then decide how the curtains support the room’s balance, scale and other design principles.
A length calculation you can adapt
Suppose the seller measures finished length from the fabric top to the hem. Your shortest measured drop from the actual fabric-top position to the floor is 99 inches. For a chosen ½-inch gap, the finished length is 99 − ½ = 98½ inches. These are hypothetical measurements.
A 96-inch panel would leave a 3-inch gap at that shortest point, not the intended ½ inch. You could order an appropriate custom length, or confirm that a longer ready-made panel can be hemmed. Account for its construction and care instructions; do not assume every panel can be shortened easily.
Step 5: check the order before buying
Retail labels commonly give width × length, but the quantity and measurement convention still need checking. Home Depot’s curtain measuring guide lists common ready-made lengths, including 63, 84, 96, 108 and 120 inches. Availability depends on the product; choose from your measurements rather than assuming the nearest standard length will work.
- Check whether the width is flat fabric, finished coverage, one panel or a pair.
- Confirm the heading fits the rod diameter or the specified track.
- Confirm who allows for returns, overlap, hems and fullness. Do not add them twice.
- Check the care label and the seller’s guidance on shrinkage or prewashing before alterations.
- Check panel quantity, pattern matching and whether accessories are included.
- Read the return and alteration terms, particularly for custom sizes.
Sheer, light-filtering and blackout fabrics serve different purposes. A blackout label describes the fabric or product, but gaps above and beside a curtain can still admit light. If darkness is a priority, consider coverage and the hardware as well as the fabric. Coordinate the treatment with your living room layout so seats do not trap the curtain or stop it opening.
Curtain measuring worksheet
Use one copy per window. Leave final order dimensions blank until the chosen supplier’s conventions are confirmed.
| Item | Your measurement or choice |
|---|---|
| Room and window | ___ |
| Mount and hardware | Inside / outside; rod or track ___ |
| Window including trim; planned extensions | ___ in + left ___ in + right ___ in |
| Final usable coverage | ___ in; returns/overlap counted by ___ |
| Width convention and fullness | Flat / finished; factor if applicable ___ |
| One panel or pair width; order quantity | ___ in per ___; buy ___ |
| Heading and length reference point | ___; included header/hardware allowance ___ |
| Drop at left / center / right | ___ / ___ / ___ in |
| Hem finish and gap or extra fabric | ___ |
| Final order dimensions and product | Width ___ in × length ___ in; product ___ |
Common curtain measuring questions
How high above the window should the rod go?
Choose a position that suits the ceiling, trim, hardware and intended curtain length. Mark it before measuring. There is no single height that works around every cornice, ceiling or window.
Can I measure the curtains I already own?
Yes, if they fit well and the replacement uses the same measurement convention. Measure a flat panel accurately, check the heading and compare it with the actual coverage and drop. A different heading can change where the replacement hangs.
Do I double the width for two curtains?
Not automatically. First calculate the total required width, then divide it among the panels. Two panels do not necessarily provide twice the required coverage, and custom pleated widths may already include fullness.
Should I buy the rug or curtains first?
Measure both before buying either. Compare fabric and rug samples together once you know the sizes. Our living room rug size guide helps you fit the other large textile to the seating group.
Conclusion
Measure curtain coverage from the intended hardware, calculate panel width using the correct fullness convention and measure length from the heading’s actual reference point. Check the hem position and quantity before placing the order. Keeping those decisions separate makes the measurements much easier to verify.
Explore our Interior Design guides for more practical ways to plan the rest of your room.

Lara Harding
Lara contributes to DIY Home Comfort. Learn more about the team and our approach on the About page.